Previous considerations.
Every railway modeling enthusiasts, even those who have never been able to enjoy their own model, have thought, designed or "dreamed" of different circuits and track paths, with end or passing stations, with industrial areas or open landscapes. However, before starting with the construction of a model, we must be clear about what we are looking for and what type of railway operation we want to carry out.

The design of a scale railroad route should not be oblivious to some elementary concepts of railway operation. It is not about becoming experts on the railway, but understanding its operation to be able to translate it into a scaled reality.
The anodyne circuits, without the possibility of creating a real operation of the model, usually end up with boring modellers and trains in showcases, there it comes the importance of spending all the necessary time to the design of the path before starting the works o material purchases. The temptation to install tracks and enjoy trains as soon as possible is huge, but the quick decisions play against us.
We must realize that the "playability" of a model depends largely on the circulation being, in addition to fluid, consistent. The railroad is a way of transport that travels from one point to another for a specific purpose: transporting passengers or merchandise. It does it in a linear way, passing through intermediate stations in its route, until reaching its destination. It does not spin, nor does it constantly go through the same place.
There are almost as many types of circuits as modellers. The more “purist” current defends paths that reproduce the essence of the real railway lines, with circuits on one level, making a rational use of the available space and looking for a purely railway operation. Other fans are inclined to take advantage of the entire surface they have, however small, with paths full of tracks at different levels (what in the slang is known as "roller coaster"). Between both, there are many intermediate ways.
In summary, it is about creating a circuit that allows us to enjoy its design, construction and the circulation of our trains. According to our own criteria, but trying to avoid some bad decisions that will break our initial enthusiasm, and keeping in mind that the “playability” of a model is probably the most important point when facing its design.

The available space.
This will be the biggest limiting factor that most modellers face when designing our model. There are few fans who can have a room exclusively dedicated to this hobby, and fortunate those who have spaces larger than a few square meters.
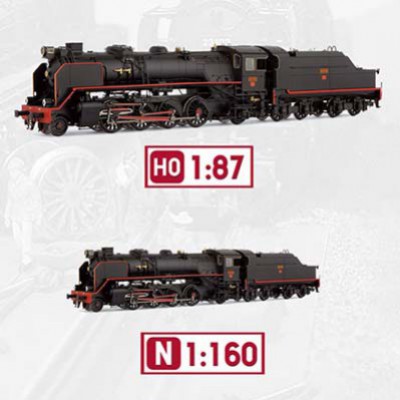
As we saw in the previous post, the available space is decisive when deciding which scale we will use. We must remember that for the same path, the H0 scale (1:87) will take an area 4 times larger than an N scale (1: 160). Once we have clear the chosen scale, we will have to draw a circuit according to the space we can count on.
What is the minimum space for a circuit in H0? (or in N) - This is a very frequent question, but it does not have a specific answer. If we stick to the commercial circuits proposed by the manufacturers of starter sets, we could have the wrong idea that 150 x 80 cm is enough to make a H0 scale model. A 1:87 scale model railroad is never going to enter this surface and the best idea, in that case, if we want to do more than just a simple oval for trains to go around, it would be to go to a smaller scale.
Usually, the space available for our model will be conditioned previously by factors from out of the hobby, being a certain surface. Knowing this data in advance, there would be two ways to deal with the design of the circuit:
1. The scale rules - If we are very clear that we want to wirk witho a specific scale, then we will have to adapt our space to this scale. If the space is small and the scale is large, the circuit will be very conditioned.
2. The circuit rules - If, on the contrary, we are clear about the circuit we want to reproduce, we would have to carry out the design of the circuit at different scales andthen we will have to decide which one best suits our space.
The curves and the minimum radius.
When designing a miniature railway path we must assume a complementary reduction to the one marked strictly by the scale, since reproducing it exactly would be infeasible for reasons of space. It is exactly in the curves where this fact is most evident.
Establishing the minimum radius in the curves of our circuit is an important decision and is determined by two aspects:
1. Mechanical criteria - The technical limitation of the rolling material itself.
2. Aesthetic criteria - The search for greater realism in the curve.

Making paths with curves too tight, forced by a small space or by the desire to put all the tracks that we can in the circuit, is a source of problems of very difficult later solution (mechanical criteria). In addition to being a cause of derailment, an excessively closed radius cause a very unsightly and unreal effect in the passage of the compositions through the curves (aesthetic criteria).
The choice of the minimum radius will undoubtedly be conditioned by the scale chosen (and the available space), but also by the type of material that we want to circulate through our model. Limiting to a exploitation of short material on secondary lines is a totally feasible option, but often many modelers want to look for the limits of the path, with material less and less adapted to the initially planned concept. Being consistent with the decisions we make during the design phase is of great importance.

The NEM 111 standard determines minimum standards according to the recommended radious depending on the type of material used (in this case, wagon cars, one of the most problematic materials). Although it is common to find wagons that circulate below the marked radious, it is convenient to take this information into consideration. The following table is a summary of this standard for scales N and H0.

Adicionalmente, es recomendable el empleo de curvas de transición, especialmente en trazados con radios pequeños. Se trata de comenzar y finalizar una curva de manera progresiva, hasta alcanzar el radio mínimo, de forma que la inscripción del material es menos brusca y permite mejorar la circulación por este tipo de radios menores.
Otro aspecto a vigilar en el diseño de las curvas de un trazado son las zonas de cambio de curvatura (o curvas en “S”), ya que son puntos en los que se fuerza al máximo la capacidad de inscripción de las composiciones. En estos casos, es recomendable emplear radios más amplios que en el resto del circuito o intercalar pequeños tramos con curvas de transición o vías rectas.
Como conclusión, podemos afirmar que lo más conveniente es emplear los radios más amplios que nuestro proyecto nos permita, teniendo en consideración que radios pequeños podrían conllevar problemas de rodaje en el material más “crítico” (vagones de bogies, automotores, locomotoras de varios ejes acoplados, etc). El uso de radios grandes nos permitirá circulaciones vistosas y fluidas en todo tipo de material, además de trazados más realistas, así como el empleo de enganches cortos.
La pendiente máxima.
Al igual que en el ferrocarril real, la pendiente máxima es otro punto crítico en nuestros trazados. Indudablemente, jugar con los cambios de nivel crea efectos muy vistosos en las maquetas y aumenta las posibilidades de juego, pero debe hacer en base a unos criterios previamente fijados.
En primer lugar, recordemos que las pendientes suelen expresarse en porcentaje (%) o en milésimas (‰). De este modo, un trazado que parte de un nivel base y, tras recorrer 100 cm, llega a un nivel 5 cm más alto, habría superado una pendiente del 5% (o de 50 milésimas).
En los trenes reales una pendiente del 2% ya sería muy considerable, sin embargo, para los trenes en miniatura aún sería una rampa asumible. Al igual que veíamos con los radios de curva, no existe una pendiente máxima estandarizada para una maqueta de trenes, depende del modelo concreto, de la composición que arrastre, de la velocidad de partida o de su longitud. Además, los modelos motorizados suelen llevar aros de adherencia que aumentan notablemente su capacidad de tracción. Como norma general se considera que un trazado en modelismo ferroviario no debería superar el 3% de desnivel, aunque si el espacio lo permite, mantener las pendientes por debajo del 2% sería lo idóneo.

Los cambios bruscos de pendiente son también un punto problemático en cualquier trazado, ya que pueden provocar descarrilamientos y desenganches accidentales en el material. Debemos realizar siempre una transición progresiva desde una zona llana hasta llegar a nuestra pendiente máxima.
Las curvas en pendiente ascendente obligan a nuestros trenes a realizar un mayor esfuerzo de tracción, debido al aumento de la fricción contra el rail. Es recomendable rebajar nuestra pendiente máxima en estos puntos del circuito, en mayor medida cuanto más cerrada sea la curva.
Además de la cuestión técnica, debemos considerar la estética. Las rampas excesivas tienden a hacer parecer irreales nuestras maquetas y pueden estropear un trazado vistoso.


 20 advices about how to paint with airbrush.
  The circuit and the railway operation
  Aoshima Models
  Which starter set do I choose?
  Tamiya in modelling: History of success